
Welcome to GoAid! In India, there are a vast majority of people who are not aware of CPR or unaware of performing CPR. In a medical emergency where the heart of a person immediately stops, then CPR can help that person to start the pumping of that heart and we can save the person for at least the time we can transfer him/her to the hospital.
At GoAid Ambulance Services, we always try to reach you within 10 minutes, doesnŌĆÖt matter where you are, but itŌĆÖs also your responsibility to at least try to keep alive until we reach you. If you are also unaware of CPR and How to Give CPR, then in this blog we have helped you with a complete set of details about CPR. If you are also willing to know about CPR in detail, then read this blog to the end.
So, letŌĆÖs start-
Complete Details about CPR ŌĆō CPR Complete Guide
We have added all the details about CPR in this blog below. Read it to the end so youŌĆÖll be able to perform CPR in the best way possible.
Full Form of CPR
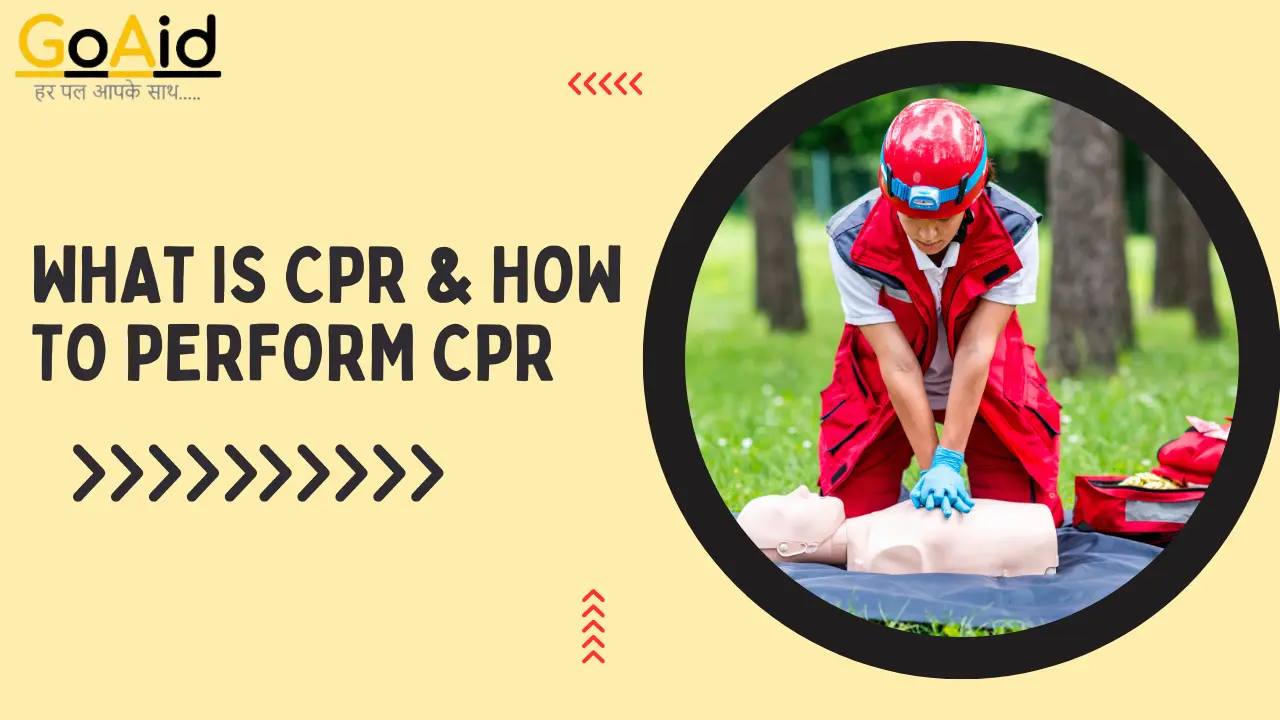
The ŌĆśCPRŌĆÖ stands for Cardiopulmonary Resuscitation, an emergency procedure to revive individuals whose heart has stopped beating or who are not breathing effectively. It involves chest compressions and rescue breaths to maintain blood circulation and oxygenation until medical help arrives.

What is CPR?
CPR, or Cardiopulmonary Resuscitation, is an emergency life-saving technique. It’s used when someone’s heart has stopped or they’re not breathing effectively. CPR involves chest compressions to manually pump blood through the body and rescue breaths to provide oxygen to the lungs.┬Ā
This maintains circulation and oxygenation of vital organs until medical help arrives. By quickly starting CPR, bystanders can significantly improve the chances of survival for someone experiencing cardiac arrest or respiratory failure.┬Ā
Training in CPR is widely available and equips individuals with the skills needed to respond effectively in emergency situations.
Background of CPR
We can understand the background of CPR By these points:
- The Chain of Survival: CPR is a crucial link in the Chain of Survival, a concept emphasizing the importance of each step in maximizing the chance of survival after cardiac arrest. These steps include:
- Early recognition of cardiac arrest and calling for help
- Early CPR
- Early defibrillation with an AED (Automated External Defibrillator)
- Effective advanced life support
- History of Development: Modern CPR techniques emerged in the mid-20th century. Efforts to revive people with cardiac arrest date back much further, though. Early methods involved techniques like bloodletting and blowing smoke into the lungs.
- Science Behind CPR: During cardiac arrest, blood flow and oxygen delivery to the brain cease rapidly. CPR helps maintain some minimal circulation, which can buy precious time before advanced medical intervention like defibrillation. It also helps prevent blood clots and lung collapse.
- Effectiveness: The effectiveness of CPR depends on how quickly it’s initiated. Bystander CPR can significantly increase the chances of survival after cardiac arrest. Studies show that immediate CPR can double or triple the survival rate.
- Evolution of Techniques: CPR guidelines and techniques are regularly updated based on ongoing research.┬Ā For instance, Hands-Only CPR, focusing solely on chest compressions, has been promoted in recent decades for bystanders with no prior training.
Also Read:
History of CPR
The history of CPR is a fascinating journey, evolving from ancient attempts to revive the deceased to the standardized techniques that save countless lives today. Here’s a detailed look at its development:
Early Attempts (Before 18th Century):
- Ancient Civilizations: References to resuscitation techniques appear in ancient Egyptian texts (around 2686 BC) and Indian Ayurveda. These methods involved bellows to inflate the lungs and rhythmic movements to stimulate the heart.
18th & 19th Centuries:
- Focus on Ventilation: The 18th century saw a shift towards techniques focusing on ventilation. The Paris Academy of Sciences (1740) recommended mouth-to-mouth resuscitation for drowning victims.
- Manual Resuscitation Techniques: Later, manual methods like the Marshall Hall method (1856) and the Silvester method (1857) gained popularity, using arm lifts and chest compressions to stimulate breathing.
20th Century: The Dawn of Modern CPR
- Early Chest Compressions: The late 19th and early 20th centuries saw a renewed interest in chest compressions. German surgeons like Moritz Schiff (1874) and Rudolph Boehm (1878) experimented with direct and indirect heart massage on animals.
- Dr. Friedrich Maass (1891): A pivotal moment occurred when Dr. Maass successfully used external chest compressions to revive two children. However, this technique didn’t gain widespread acceptance at the time. Open-heart massage remained the standard approach for several decades.
The Mid-20th Century: Birth of Modern CPR
- The 1950s: This period saw significant breakthroughs in CPR development.
- Mouth-to-Mouth Resuscitation: Peter Safar and James Elam developed mouth-to-mouth resuscitation in 1956, a critical step towards modern CPR.
- Military Adoption: The US military readily adopted this method in 1957, recognizing its potential for battlefield resuscitation.
- The 1960s: The defining moment arrived in 1960.
- Combining Techniques: Two research teams, led by Kouwenhoven/Jude/Knickerbocker and Safar/Elam/Escarraga, independently demonstrated the effectiveness of combining chest compressions with mouth-to-mouth breaths.
- Cardiopulmonary Resuscitation (CPR) is Born: This combination of techniques marked the birth of modern CPR as we know it.
- Standardization and Public Education: The American Heart Association (AHA) played a crucial role by:
- Launching a program in 1960 to educate physicians about closed-chest cardiac resuscitation.
- Endorsing CPR in 1963.
- Establishing standardized training and performance guidelines in collaboration with other organizations.
Late 20th & 21st Centuries: Refinements and Expansion
- CPR Training for the Public: The AHA spearheaded a major public education campaign in the 1970s, encouraging bystanders to learn CPR.
- Hands-Only CPR: In recent decades, Hands-Only CPR, focusing solely on chest compressions, has been promoted for untrained bystanders, making intervention even more accessible.
- Continuous Improvement: CPR guidelines and techniques are continuously refined based on ongoing research.
Also Read: What is diabetes? Complete Guide
The Legacy of CPR
Today, CPR is a cornerstone of emergency medicine, empowering bystanders to intervene and significantly improve survival rates after cardiac arrest. Its journey from ancient practices to a standardized lifesaving technique is a testament to scientific progress and its dedication to saving lives.
Different Type of CPR
There are several main types of CPR tailored for different situations and rescuer training levels:
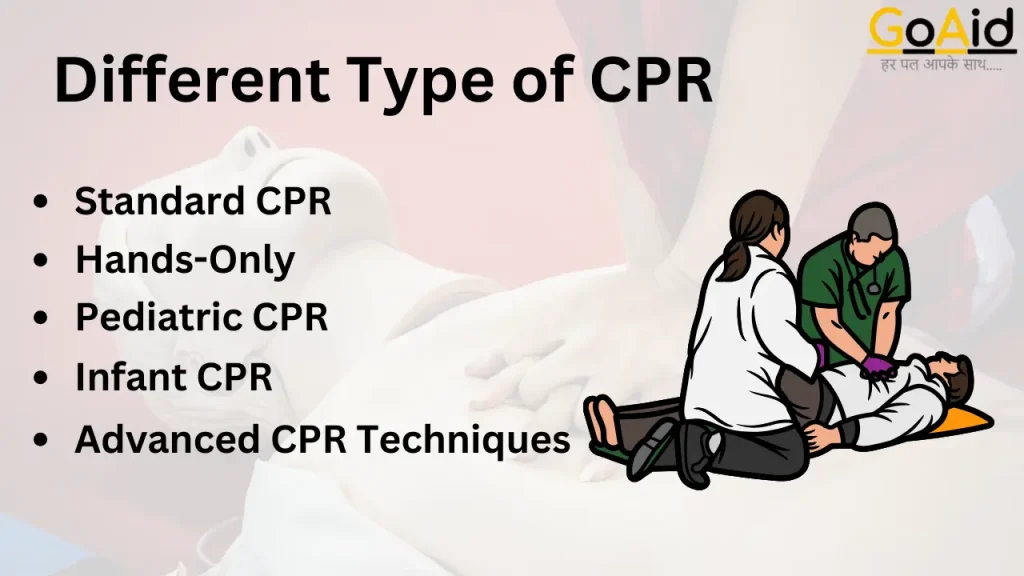
1. Standard CPR (Traditional CPR)
This is the most comprehensive CPR technique for trained individuals. It involves cycles of chest compressions and rescue breaths, typically in a ratio of 30:2. This method is preferred when a rescuer is confident in performing both compressions and breaths.
2. Hands-Only CPR (Compression-Only CPR)
This simplified CPR technique is ideal for bystanders with no prior training. It focuses solely on delivering uninterrupted chest compressions at a rate of 100-120 per minute. This method is easier to learn and remember, reducing hesitation in starting CPR during a cardiac emergency.
3. Pediatric CPR
This CPR variation is specifically designed for infants and children. It differs from adult CPR in terms of compression depth, hand placement, and rescue breath technique due to the smaller chest size and delicate anatomy of children.
4. Infant CPR
A specialized technique for newborns and very young infants. It involves using two or three fingers for chest compressions and modified rescue breaths due to the extremely small size of an infant’s chest and airway.
5. Advanced CPR Techniques
These techniques are typically used by medical professionals in hospital settings. They may involve devices like bag-valve masks for ventilation and medications to improve circulation. Examples include Interposed Abdominal CPR (IAC-CPR) and Open-Chest CPR, requiring advanced training and performed in specific situations.
How to Choose the Right CPR?
The type of CPR used depends on the victim’s age and the rescuer’s training level.
- Adults: Standard CPR or Hands-Only CPR can be used.
- Children: Pediatric CPR is the appropriate technique.
- Infants: Infant CPR should be used.
- Medical Settings: Advanced techniques may be employed by trained medical personnel.
Methods of CPR
CPR methods can be broken down into two main categories: those involving rescue breaths and those focusing solely on chest compressions. Here’s a breakdown of both:
1. CPR with Rescue Breaths (Standard CPR):
This method is typically used by trained individuals who are comfortable performing both chest compressions and rescue breaths. Here’s a step-by-step breakdown:
- Scene Safety: Ensure the scene is safe for yourself and the victim before approaching.
- Check Responsiveness: Gently shake the victim and ask loudly if they are okay.
- Call for Help: If unresponsive, call emergency services 8008280020 immediately or have someone else do it.
- Position the Victim: Lay the victim flat on their back on a hard, level surface.
- Open the Airway: Use the head-tilt/chin-lift maneuver to open the airway.
- Check for Breathing: Look, listen, and feel for normal breathing for no more than 10 seconds.
- Begin CPR: If not breathing normally, start CPR cycles.
Chest Compressions:
- Place the heel of your hands on the center of the chest, just below the nipple line.
- Push hard and fast at a rate of 100-120 compressions per minute.
- Allow the chest to rise fully between compressions.
- Deliver 30 chest compressions
Rescue Breaths:
- Pinch the victim’s nose shut.
- Create a seal with your mouth over their mouth.
- Give two breaths, each lasting about 1 second, observing chest rise with each breath.
- Continue Cycles: Repeat cycles of 30 chest compressions and 2 rescue breaths until help arrives or the victim shows signs of life (breathing and movement).
2. Hands-Only CPR (Compression-Only CPR):
This simplified method is ideal for bystanders with no prior CPR training. It focuses on delivering continuous chest compressions without mouth-to-mouth breaths. Here’s how to perform it:
- Scene Safety: Ensure the scene is safe for yourself and the victim before approaching.
- Check Responsiveness: Gently shake the victim and ask loudly if they are okay.
- Call for Help: If unresponsive, call emergency services immediately or have someone else do it.
- Position the Victim: Lay the victim flat on their back on a hard, level surface.
- Begin Chest Compressions:
- Place the heel of your hands on the center of the chest, just below the nipple line.
- Push hard and fast at a rate of 100-120 compressions per minute.
- Allow the chest to rise fully between compressions.
- Continue Compressions: Maintain uninterrupted chest compressions until help arrives or the victim shows signs of life (breathing and movement).
Key thing to Remind
- Regardless of the method used, prioritize starting CPR as soon as possible. Every minute without CPR decreases the chance of survival.
- If you’re hesitant to perform mouth-to-mouth breaths, Hands-Only CPR is still highly effective and can significantly improve survival rates.
- CPR training courses can equip you with the skills and confidence to perform CPR effectively in an emergency.
Process of CPR ŌĆō Steps for CPR (Step By Step Guidance)
If, by any chance, if you find anyone with medical emergency requiring the CPR, then you should consider these process:
Things to Ensure Before Starting CPR
Before starting CPR, it’s essential to ensure certain things for the safety of both the rescuer and the victim. Here’s a list of things to ensure before beginning CPR:
- Assess the Scene: Ensure that the area is safe for both you and the victim. Look for any potential dangers, such as traffic, fire, or hazardous materials, before approaching the person.
- Check for Responsiveness: Tap the person’s shoulders and shout loudly, “Are you okay?” Look for any signs of responsiveness, such as movement, groaning, or opening their eyes.
- Call for Help: If the person is unresponsive, immediately call emergency medical services (EMS) or instruct someone else to call while you begin CPR. Time is crucial in these situations, and getting professional help as soon as possible is vital.
- Gather Necessary Equipment (if available): If an automated external defibrillator (AED) is available nearby, ensure it is accessible and ready to use. AEDs can analyze the victim’s heart rhythm and deliver a shock if necessary, which can be crucial in certain cases of cardiac arrest.
- Ensure a Firm Surface: Lay the person on a firm, flat surface before starting CPR. This allows for proper chest compressions and ensures the victim’s stability during the procedure.
- Expose the Chest: Remove any clothing covering the person’s chest to expose their bare skin. This allows for proper placement of hands during chest compressions and ensures effective delivery of rescue breaths if needed.
- Positioning: Ensure the person is lying on their back, and their airway is clear and open. Tilt their head back slightly to help keep the airway open during rescue breaths.
- Protective Measures (if needed): If the person is known to have a contagious disease or if there are concerns about bodily fluids, consider using personal protective equipment (PPE) such as gloves or a face mask to protect yourself from potential infection.
Steps of CPR: CPR for Adults
- Assess the Scene: Ensure the area is safe for both you and the victim.
- Check for Responsiveness: Tap the person’s shoulders and shout loudly, “Are you okay?”
- Call for Help: If the person is unresponsive, call emergency medical services (EMS) [+91- 80082-80020] or instruct someone else to call.
- Check Breathing: Tilt the person’s head back slightly and check for normal breathing for no more than 10 seconds.
- Perform Chest Compressions
- Place the heel of one hand in the center of the person’s chest (between the nipples).
- Place the other hand on top, interlocking fingers.
- Perform compressions at a rate of about 100-120 compressions per minute.
- Give Rescue Breaths (if trained)
- Tilt the person’s head back slightly and lift the chin to open the airway.
- Pinch the person’s nose shut and cover their mouth with yours, creating an airtight seal.
- Give two rescue breaths, each lasting about one second.
- Continue CPR: Alternate between 30 chest compressions and 2 rescue breaths. Keep repeating this cycle until help arrives or the person shows signs of life.
Steps of CPR: CPR for Children
- Steps for CPR on children are similar to those for adults, with some adjustments:
- Use one hand for chest compressions on children aged 1 to puberty.
- Compress the chest about one-third to one-half the depth of the chest, about 2 inches.
- Give rescue breaths by covering the child’s mouth and nose with your mouth, providing gentle breaths.
Steps of CPR: CPR for Infants
For infants (up to age 1), CPR steps are modified:
- Assess the Scene, Check Responsiveness, and Call for Help.
- Place the infant on a firm surface, tilt their head back slightly to open the airway, and check for breathing for no more than 10 seconds.
- Perform chest compressions using two fingers in the center of the chest, compressing about 1.5 inches deep.
- Give gentle rescue breaths, covering both the infant’s mouth and nose with your mouth.
- Continue cycles of 30 compressions and 2 breaths until help arrives or the infant starts breathing on their own.
Pathophysiology of CPR
The pathophysiology of CPR revolves around the concept of maintaining minimal blood circulation and oxygen delivery to vital organs, particularly the brain, during cardiac arrest. Here’s a breakdown of the key points:
Cardiac Arrest and Its Consequences:
Sudden Cardiac Arrest: This occurs when the heart stops beating effectively, halting blood flow throughout the body.
Immediate Threat: Within seconds, oxygen delivery to the brain ceases. Brain cells begin to die without oxygen, leading to irreversible damage if circulation isn’t restored quickly.
The Role of CPR:
CPR works through several mechanisms to improve the chances of survival:
- Artificial Circulation: Chest compressions act like a mechanical pump, squeezing the heart muscle and forcing some blood out of the heart and into circulation. This limited blood flow, though not normal circulation, can deliver some oxygenated blood to vital organs.
- Improved Oxygen Delivery: Even minimal blood flow from CPR can help maintain some oxygen delivery to the brain and other organs, delaying cell death and preserving function until further medical intervention can be provided.
- Promoting Blood Flow: Chest compressions can also help prevent blood clots from forming in the heart and lungs, further improving circulation when the heart restarts.
Limitations of CPR:
It’s important to understand that CPR is not a definitive treatment for cardiac arrest. It’s a crucial temporary measure to buy time until definitive treatment, such as defibrillation with an AED (Automated External Defibrillator), can be administered.
Factors Affecting CPR Effectiveness:
- Time: The sooner CPR is initiated, the better the chances of survival. Brain damage starts rapidly after cardiac arrest, so early intervention is critical.
- Compression Depth and Rate: Delivering chest compressions at the correct depth and rate (100-120 compressions per minute) is essential for maximizing blood flow during CPR.
- Rescuer Training: Trained individuals can perform CPR more effectively, including rescue breaths in standard CPR, which can provide some additional oxygen.
Benefits of CPR
These are the some of key benefits of CPR:
- Maintains Circulation: CPR helps maintain blood circulation to vital organs, including the brain and heart, during cardiac arrest.
- Increases Chance of Survival: Prompt initiation of CPR can significantly increase the chances of survival for someone experiencing cardiac arrest or respiratory failure.
- Preserves Brain Function: By providing oxygenated blood to the brain, CPR helps prevent brain damage and improves the likelihood of a meaningful recovery.
- Empowers Bystanders: CPR training empowers bystanders to intervene in emergency situations, potentially saving lives before professional medical help arrives.
- Reduces Long-Term Disabilities: Effective CPR can reduce the risk of long-term disabilities in survivors by maintaining vital organ function until advanced medical care is available.
Latest Technologies for CPR
CPR technology is evolving alongside advancements in medicine and electronics. Here are some areas where technology is making CPR more effective and accessible:
1. CPR Training and Simulation Tools:
- Virtual Reality (VR) and Augmented Reality (AR): VR can create immersive training scenarios where learners practice CPR in realistic environments. AR overlays digital information onto the real world, providing real-time feedback on hand placement, compression depth, and ventilation technique during CPR practice on manikins.
2. Wearable Technology for Monitoring and Assistance:
- Biofeedback Devices: Wearables can monitor a person’s heart rhythm and vitals, potentially alerting bystanders to a cardiac arrest and providing CPR guidance.
- Smartwatches with Built-in CPR Prompts: Some smartwatches can detect potential cardiac arrest and prompt users to call for help and initiate CPR, with audiovisual instructions.
3. Advanced CPR Devices:
- Mechanical CPR Devices: These devices are being explored as an alternative or adjunct to manual CPR. They can deliver consistent chest compressions, potentially reducing rescuer fatigue and improving CPR quality.
4. Telemedicine Integration:
- Remote Medical Support: Telemedicine technologies could allow for remote medical professionals to guide CPR efforts in real-time, particularly in areas with limited access to advanced medical care.
5. Algorithmic Advancements:
- Machine Learning for Personalized CPR: Researchers are exploring the potential of machine learning algorithms to personalize CPR techniques based on factors like a victim’s age, weight, and underlying medical conditions.
CPR for Animals
While the core principle of CPR (maintaining circulation and oxygen delivery) is similar for humans and animals, there are some key differences in performing CPR on pets. Here’s a breakdown of CPR for animals:
When is CPR Needed for Animals?
Just like humans, animals can experience cardiac arrest and require CPR if they are not breathing and have no heartbeat. This can be caused by various factors like choking, drowning, electric shock, or trauma.
Differences in CPR for Animals
- Size Matters: CPR techniques differ depending on the animal’s size. Larger animals like dogs require chest compressions similar to humans, while smaller animals like cats or rabbits need modified techniques.
- Hand Placement: The location for chest compressions varies depending on the animal’s anatomy. For dogs, compressions are done over the widest part of the chest, while for cats, they’re done behind the front legs.
- Rescue Breaths: The decision to perform rescue breaths depends on your comfort level and the animal’s condition. If you’re unsure, focus on chest compressions.
- Speed of Compressions: The compression rate is generally faster for smaller animals compared to humans.
General Steps of CPR for Animals
- Check the Scene: Ensure your safety and the safety of the animal before approaching.
- Assess Responsiveness: Gently shake or nudge the animal and call out their name.
- Call for Veterinary Help Immediately: Every second counts, so have someone else call a veterinarian or emergency animal clinic while you begin CPR.
- Position the Animal: Lay the animal on a flat, firm surface.
- Check for Breathing: Look for chest movement and feel for breaths near the nose. Look for no more than 10 seconds.
- Begin CPR: If not breathing, initiate CPR cycles.
- Chest Compressions: Locate the appropriate compression point and deliver compressions at the recommended rate for your animal’s size.
- Rescue Breaths (Optional): If comfortable, pinch the animal’s nose shut and create a seal with your mouth over their mouth or nose. Deliver short breaths, observing for chest rise.
- Continue Cycles: Repeat cycles of chest compressions (with or without breaths) until the animal shows signs of life (breathing and movement) or veterinary help arrives.
How to Learn How CPR
Learning CPR is essential for anyone who wants to be prepared to respond to emergencies effectively. Here’s how you can learn CPR:
1. Find a CPR Course
Look for CPR courses offered by reputable organizations such as the American Heart Association (AHA), the Red Cross, or other certified training centers. These organizations offer various types of CPR courses tailored to different needs and levels of proficiency.
2. Choose the Right Course
Select the appropriate CPR course based on your needs and level of training required. Courses may include Basic Life Support (BLS) for healthcare providers, Heartsaver CPR/AED for lay rescuers, or specialized courses for specific populations like infants and children.
3. Attend In-Person Training
Get enroll in an in-person CPR training course conducted by certified instructors. In-person training provides hands-on practice with CPR techniques, feedback from instructors, and the opportunity to ask questions.
4. Online Training
Some organizations offer blended learning options, combining online modules with in-person skills sessions. Completing the online portion at your own pace allows for flexibility, followed by hands-on practice during a scheduled skills session.
5. Practice Regularly
After completing a CPR course, practice the skills regularly to maintain proficiency. Consider participating in refresher courses or practice sessions to reinforce your knowledge and skills.
6. Stay Informed
Stay updated on the latest CPR guidelines and techniques through reputable sources such as the American Heart Association or the Red Cross. CPR guidelines may evolve over time based on new research and advancements in resuscitation science.
7. Encourage Others to Learn
Encourage friends, family members, and colleagues to learn CPR as well. The more people trained in CPR, the greater the chance of someone being able to respond effectively in an emergency.
Special Consideration for CPR
Special considerations for CPR involve adjustments or additional steps to ensure the safety and effectiveness of CPR in specific situations. Here are some key considerations:
1. Age and Size
- Children: Use one hand for chest compressions in children aged 1 to puberty, and adjust the depth and force of compressions accordingly.
- Infants: Use two fingers in the center of the chest for compressions and provide gentler rescue breaths, covering both the mouth and nose.
2. Pregnancy
In case of pregnant woman requires CPR, place her on her left side to relieve pressure on the vena cava, enhancing blood flow to the heart and brain.
3. Injury and Trauma
If there is suspicion of spinal injury, maintain manual stabilization of the head and neck while performing CPR, avoiding excessive movement that could worsen the injury.
4. Choking
If person is choking, perform abdominal thrusts (Heimlich maneuver) to dislodge the obstruction before initiating CPR.
5. Drowning
For drowning victims, ensure proper removal of water from the airway before initiating CPR. If a bystander witnessed the drowning, start with rescue breaths before compressions.
6. Electrocution
Ensure the scene is safe from electrical hazards before starting CPR on someone who has been electrocuted. Do not touch the person until it is safe to do so.
7. Medical Conditions
Adapt CPR techniques for individuals with medical conditions or disabilities, such as using an alternative hand placement for compressions if the person has a pacemaker or implanted medical device.
8. Personal Protective Equipment (PPE)
Use gloves and other PPE, if available, to protect yourself from potential exposure to bodily fluids or contagious diseases.
9. Exhaustion
If performing CPR becomes physically exhausting, switch rescuers every 2 minutes to maintain the quality of chest compressions and minimize fatigue.
10. Advanced Life Support (ALS)
Be prepared to transition to advanced life support techniques if additional medical personnel or equipment becomes available during resuscitation efforts.
Tips for CPR
Here are some tips for performing CPR effectively:
Check for Safety: Ensure the scene is safe for both you and the victim before approaching.
Assess Responsiveness: Tap the person’s shoulders and shout loudly, “Are you okay?” Look for any signs of responsiveness.
Call for Help: If the person is unresponsive, call emergency medical services (EMS) immediately or instruct someone else to call while you begin CPR.
Follow the ABCs: Airway, Breathing, Circulation.
- Ensure the airway is clear and open.
- Check for normal breathing for no more than 10 seconds.
- Begin chest compressions to maintain circulation if the person is not breathing normally.
Perform High-Quality Chest Compressions:
- Place the heel of one hand on the center of the person’s chest (between the nipples).
- Use your body weight to press down firmly and quickly, aiming for a depth of about 2 inches for adults.
- Maintain a rate of about 100-120 compressions per minute.
- Allow the chest to fully recoil between compressions.
Give Effective Rescue Breaths (if trained):
- Tilt the person’s head back slightly and lift the chin to open the airway.
- Pinch the person’s nose shut and cover their mouth with yours, creating an airtight seal.
- Deliver two rescue breaths, each lasting about one second, and watch for the chest to rise.
Use an Automated External Defibrillator (AED) (if available):
- If an AED is nearby, follow the device’s voice prompts for use.
- Apply pads to the person’s bare chest as directed.
- Stand clear and allow the AED to analyze the heart rhythm. Deliver a shock if advised.
- Don’t Stop CPR: Continue CPR until help arrives, or the person shows signs of life and begins breathing normally.
- Switch Rescuers Every 2 Minutes: If performing CPR becomes physically exhausting, switch rescuers every 2 minutes to maintain the quality of chest compressions and minimize fatigue.
- Get Trained and Stay Current: Regularly attend CPR training courses to stay up-to-date on the latest techniques and guidelines. Practice CPR skills regularly to maintain proficiency.
Also Read: How To Calculate Pregnancy Weeks?
FAQs related to Performing CPR
Question-1: What is CPR?
Answer. CPR stands for Cardiopulmonary Resuscitation, an emergency procedure used to revive individuals whose heart has stopped beating or who are not breathing effectively.
Question-2: Who should learn CPR?
Answer. Anyone can learn CPR, including healthcare professionals, first responders, teachers, parents, caregivers, and concerned citizens.
Question-3: Why is CPR important?
Answer. CPR is crucial because it helps maintain blood circulation and oxygenation to vital organs, such as the brain and heart, until further medical help arrives.
Question-4: What are the main components of CPR?
Answer. The main components of CPR include chest compressions to pump blood through the body and rescue breaths to provide oxygen to the lungs.
Question-5: How do I perform chest compressions?
Answer. To perform chest compressions, place the heel of one hand on the center of the person’s chest (between the nipples) and interlock your fingers. Push down firmly and quickly at a rate of about 100-120 compressions per minute.
Question-6: When should I start CPR?
Answer. Start CPR immediately if the person is unresponsive and not breathing normally. Time is critical in these situations, and early intervention can improve outcomes.
Question-7: How do I check for responsiveness?
Answer. To check for responsiveness, tap the person’s shoulders and shout loudly, “Are you okay?” Look for any signs of responsiveness, such as movement or verbal response.
Question-8: What if the person is breathing but unconscious?
Answer. If the person is unconscious but breathing, maintain an open airway and monitor their condition until help arrives.
Question-9: Should I perform CPR on someone with a pulse?
Answer. No, do not perform CPR on someone with a pulse. Check for normal breathing and signs of circulation before starting CPR.
Question-10: Can I perform CPR on a pregnant woman?
Answer. Yes, CPR can be performed on a pregnant woman. Place her on her left side to relieve pressure on the vena cava and follow standard CPR procedures.
Question-11: How long should I continue CPR?
Answer. Continue CPR until emergency medical services (EMS) arrive, or the person shows signs of life and starts breathing normally.
Question-12: What if I’m unsure about performing CPR?
Answer. If you’re unsure about performing CPR, remember that any attempt at CPR is better than no attempt at all. Follow the basic steps and provide assistance until help arrives.
Question-13: Is it necessary to perform rescue breaths during CPR?
Answer. Rescue breaths are a vital component of CPR, as they provide oxygen to the lungs. However, Hands-Only CPR (chest compressions without rescue breaths) is an alternative for untrained bystanders or in certain situations.
Question-14: Can I perform CPR on a choking victim?
Answer. If the person is choking and becomes unresponsive, perform CPR, starting with chest compressions. If you can see an object blocking the airway, attempt to remove it with abdominal thrusts (Heimlich maneuver) before starting CPR.
Question-15: Should I perform CPR on a drowning victim?
Answer. Yes, perform CPR on a drowning victim if they are unresponsive and not breathing normally. Start with rescue breaths to clear any water from the airway before initiating chest compressions.
Question-16: What should I do if an automated external defibrillator (AED) is available?
Answer. If an AED is available, follow the device’s voice prompts for use. Apply pads to the person’s bare chest, stand clear, and allow the AED to analyze the heart rhythm. Deliver a shock if advised.
Question-17: Can I perform CPR on a person with a pacemaker?
Answer. Yes, CPR can be performed on a person with a pacemaker. Place your hands slightly to the side of the pacemaker site for chest compressions.
Question-18: How often should I renew my CPR certification?
Answer. CPR certification typically needs renewal every one to two years to stay current with updated guidelines and techniques.
Question-19: Can I perform CPR on a person with ribs or chest injuries?
Answer. Yes, CPR should still be performed on a person with ribs or chest injuries. The benefits of CPR outweigh the risk of further injury.
Question-20: Where can I learn CPR?
Answer. CPR training courses are available through organizations such as the American Heart Association (AHA), the Red Cross, and certified training centers. These courses offer hands-on instruction and certification in CPR techniques.